
Bathroom Complete Guide to Transforming Your Space
October 11, 2025
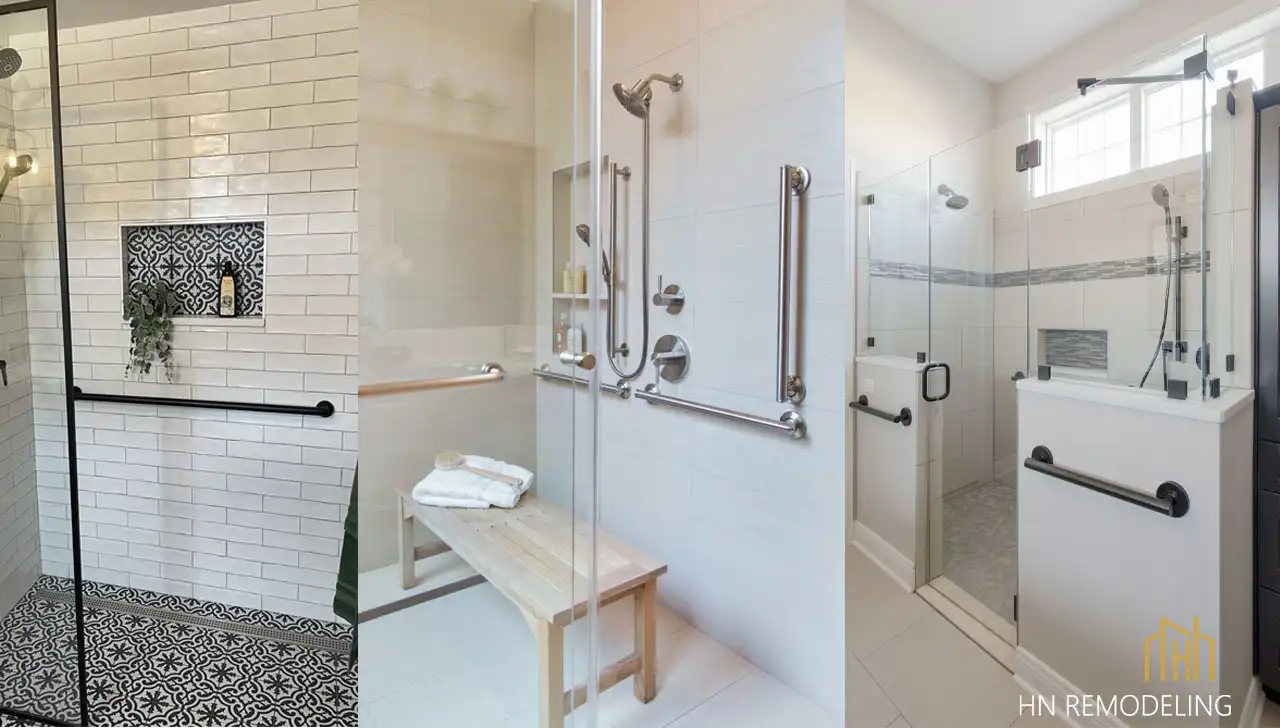
The Ultimate Guide to Handicap & Senior Bathroom Remodel: Safety, Accessibility, and Design
October 29, 2025
For decades, the standard bathtub served as the centerpiece of American bathrooms. However, as lifestyles evolve and homeowners prioritize efficiency, safety, and modern aesthetics, the traditional tub-and-shower combination is increasingly being replaced. Tub-to-shower conversion (or bathtub to shower conversion) is now one of the most popular and impactful home renovation projects, transforming outdated, cramped spaces into sleek, accessible, and high-functioning walk-in showers.
This conversion is more than just an aesthetic upgrade; it’s a commitment to a safer, easier-to-maintain, and often more valuable home. In this complete guide, we will walk you through everything you need to know about a tub to shower remodel, from the detailed technical steps and essential design considerations to a clear breakdown of costs and how to choose the right professional.
Key Benefits of Tub-to-Shower Conversion
- Enhanced Safety
- Modern Aesthetics
- Improved Accessibility
- Easier Maintenance
- Optimized Space
Key Benefits of a Tub-to-Shower Remodel
The decision to install a shower to replace a tub stems from several practical and design-oriented advantages.
Enhanced Accessibility and Safety
Safety is the single biggest motivator for many homeowners considering this remodel. Climbing over the high edge of a bathtub—typically 14 to 20 inches—is a daily hazard. This difficulty is magnified for seniors, people with mobility issues, or those recovering from surgery.
A professionally installed walk-in shower dramatically improves safety by removing this barrier. Key accessibility features often incorporated include:
- Curbless Entry: A shower floor flush with the bathroom floor, allowing wheelchair or walker access.
- Grab Bars: Sturdy, ADA-compliant bars installed into the wall studs for secure support.
- Built-in Seating: A bench or fold-down seat for a comfortable and safer showering experience.
This focus on accessibility makes the conversion a crucial component of aging-in-place design, providing peace of mind and long-term independence.
Space Optimization in Small Bathrooms
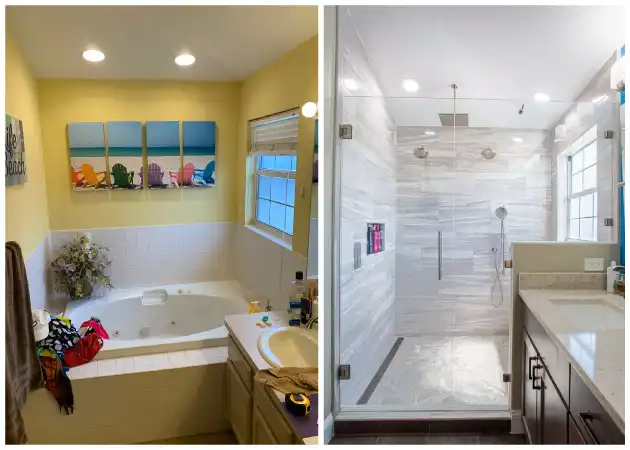
In older homes, bathrooms are often small and compartmentalized. A large, bulky bathtub can make a small bathroom tub to shower conversion feel cramped and dated.
By replacing the tub with a standard shower base and, crucially, a clear glass enclosure, you trick the eye into seeing a much larger space. The glass allows light to pass through and extends the visual sightline to the back wall of the shower. This is particularly effective in a small bathroom tub to shower conversion making the entire room feel more open and modern.
Modern Aesthetics and Increased Home Value
Contemporary homebuyers often prefer the convenience and sleek look of a large walk-in shower. A beautifully tiled, spacious shower with modern fixtures is viewed as a high-value amenity. While replacing a tub with a shower in the only bathroom of a home can sometimes deter families with young children, in a home with two or more bathrooms, converting a secondary tub can be a huge selling point, significantly boosting the home’s perceived and actual resale value.
The Complete Step-by-Step Conversion Process
A proper tub to shower remodel is not a superficial job; it involves essential plumbing and waterproofing work. While the speed of the project depends on whether you opt for a tile or an acrylic system, the core steps remain the same.
Step 1: Demolition and Removal
The project begins with the meticulous removal of the existing bathtub, surrounding wall materials (tile, drywall, etc.), and old shower fixtures.
- Disconnect Plumbing: Water lines are shut off and disconnected from the tub faucet and drain.
- Tub Removal: If the tub is fiberglass or acrylic, it may be cut into pieces for easier removal. Cast iron tubs are typically broken up with a sledgehammer (a messy, noisy job) or removed intact by a professional team.
- Subfloor Inspection: Once the tub is out, the subfloor beneath is inspected for any signs of water damage, mold, or mildew. Any damaged material must be replaced before proceeding.
Step 2: Plumbing Adjustments
The drain location for a standard bathtub is often near the center, while many shower bases or tiled drains require the drain line to be adjusted slightly.
- Drain Rerouting: A plumber must adjust the P-trap and drain pipe to align perfectly with the new shower pan or linear drain.
- Valve and Shower Head Relocation: The mixing valve (where the hot and cold water meet) and the showerhead pipe typically need to be raised higher on the wall to accommodate a standing shower height. This often involves cutting into the wall to access the pipes.
Step 3: Installation of the Shower Base (Shower Pan)
The shower base is the foundation of your new shower. This is where the conversion takes its first major direction:
- Pre-fabricated Base: An acrylic, fiberglass, or solid surface pan is set level onto a mortar bed for stability. This is faster and excellent for a quick or one day tub to shower conversion.
- Tiled Base: A custom-sloped mortar bed (or pre-sloped foam pan) is installed, followed by a rubber or vinyl waterproof membrane. This allows for customized sizes and tile selection but requires more time and expertise.
Step 4: Waterproofing and Wall Installation
This is arguably the most critical step to ensure the longevity of your shower. Proper waterproofing prevents water from seeping into the wall cavity, which causes mold and structural damage.
- Moisture Barriers: Cement board or specialized foam boards (like Schluter Kerdi) are installed on the walls.
- Sealing: All seams, corners, and fastener heads are waterproofed using specialized sealant or waterproofing membrane. This forms a continuous, watertight envelope.
Step 5: Finishing and Enclosure Installation
- Wall Finish: If using a custom design, tiles are installed and grouted. If using a system like Bath Fitter tub to shower conversion, pre-fabricated acrylic or composite wall panels are adhered directly to the wall surface.
- Fixture Installation: The new shower valve, shower head (including handheld options), and controls are installed.
- Glass Enclosure: The final step involves installing the shower enclosure. The most popular choice is a frameless glass door or a stationary glass panel, which enhances the open, clean look.
Understanding Tub-to-Shower Conversion Costs
The cost of a tub to shower conversion varies drastically based on the materials chosen and whether you hire a full-service contractor or a specialized installer. This cost data will help you understand where your budget will be allocated.
The average cost range for a professional conversion typically falls between $3,500 and $12,000 USD.
| Cost Factor | Low-End (Prefab Acrylic) | Mid-Range (Local Contractor, Basic Tile) | High-End (Custom Tile & Glass) |
|---|---|---|---|
| Base/Pan | Acrylic/Fiberglass Insert | Acrylic or Standard Tile | Custom Tiled Curbless Pan |
| Wall Material | Acrylic/Composite Liners (e.g., Bath Fitter) | Mid-Range Porcelain Tile | Large Format Tile or Solid Stone Slabs |
| Enclosure | Framed Glass/Shower Curtain | Semi-Frameless Glass Door | Frameless Glass Enclosure |
| Fixtures | Standard Chrome Faucet Set | Mid-Range Delta/Moen Set | High-End Thermostatic Valve, Rainfall Head, Body Sprays |
| Plumbing Changes | Minimal (Drain adjustment only) | Moderate (Valve raised, P-trap adjusted) | Extensive (Potential for new hot/cold lines) |
| Estimated Cost Range | $3,500 – $6,000 | $6,000 – $9,500 | $9,500 – $15,000+ |
the “One Day” Cost Question
The term one day tub to shower conversion cost almost always refers to a proprietary system offered by large companies. These systems work quickly because they use pre-measured acrylic liners and wall panels that fit over existing structures (or after minimal demolition).
While fast and mess-free, they often come with a high price tag (sometimes $7,000-$15,000, depending on the brand and financing) and they avoid addressing potential mold or water damage lurking underneath the old tub and wall materials.
Choosing the Best Conversion Company
Selecting the right professional is critical to ensuring your tub to shower remodel is done correctly, especially concerning proper waterproofing. The landscape of tub to shower conversion companies is split into two main groups.
Specialized, National Brands (e.g., Bath Fitter, Re-Bath)
These companies focus solely on bathroom wet-area renovations, often specializing in fast, one-day installations using acrylic or composite overlays.
- Keywords Addressed: $\text{best tub to shower conversion companies}$, $\text{bath fitter tub to shower conversion}$.
- Pros: Extremely fast installation (often 1-2 days), lifetime warranties on the acrylic products, less mess, consistent product quality.
- Cons: Higher price point than many local contractors, limited customization (you are restricted to their panel colors and accessories), and they often install over the existing wall structure, which can conceal underlying moisture problems.
Local General Contractors and Independent Remodelers
These professionals perform full, traditional remodels, which is necessary if you desire custom tile work, a curbless entry, or high-end fixtures.
- Pros: Full customization (limitless choice of tile, glass, and fixture brands), complete rip-and-replace service (ensuring the subfloor and wall studs are healthy), and often a lower final price.
- Cons: Project timeline is significantly longer (3 to 7 days, sometimes more), and requires more homeowner involvement in material selection.
The Bath Fitter Tub to Shower Conversion Model
Bath Fitter is the industry leader in the overlay model. Their conversion involves fabricating a seamless acrylic wall system and shower base that is custom-fitted to the dimensions of your existing tub space and then installed directly over the old walls. While highly efficient, homeowners should weigh the quick turnaround time against the lack of custom tile work and the fact that the underlying wall structure is rarely fully exposed and inspected.
Design and Material Considerations
The aesthetics of your new shower are determined by your material choices, impacting both the final look and the long-term maintenance.

The Shower Base: Tiled vs. Pre-fabricated
- Tiled Base: Requires precise planning and waterproofing, but offers a seamless look with the bathroom floor (ideal for curbless entry) and complete design flexibility. This is the choice for a true custom look.
- Pre-fabricated Base (Acrylic/Solid Surface): Easy to clean, durable, and installed quickly. Choose a slip-resistant texture. For a small bathroom tub to shower conversion, a standard rectangular size is often the fastest choice.
Wall Materials: Tile vs. Panel Systems
- Ceramic/Porcelain Tile: The standard choice for durability, water resistance, and endless design possibilities. Requires grout, which is the only part that needs maintenance (sealing and cleaning).
- Solid Surface or Composite Panels: These large, grout-free sheets (often acrylic, quartz, or PVC composites) are highly water-resistant, fast to install, and virtually maintenance-free. They are the go-to for a $\text{one day tub to shower conversion}$.
The Shower Enclosure
This is the key visual element replacing the tub.
- Frameless Glass: The modern standard. Uses thick, tempered glass (3/8″ or 1/2″) with minimal hardware. Maximizes light and sightlines, making the bathroom feel largest.
- Semi-Frameless Glass: Uses slightly thinner glass with framing only around the edges, offering a good balance between cost and modern aesthetics.
- Walk-in/Fixed Panel: A single, stationary glass panel that separates the shower from the rest of the room. This provides the most open feeling and is best for small bathroom tub to shower conversion projects.
Conclusion: Taking the Next Step in Your Remodel
Converting your bathtub to a dedicated shower is a smart investment that pays dividends in safety, aesthetics, and convenience. If you are planning to remodel your bathroom in Plano, replacing a bulky, seldom-used fixture with a sleek walk-in shower will instantly modernize your space and greatly improve its daily functionality.
Whether you prioritize a rapid, acrylic overlay from one of the major tub to shower conversion companies or a fully customized, tiled design from a local contractor, proper planning and attention to detail—especially waterproofing—are paramount.
Don’t let an outdated or unsafe bathtub dictate the function of your home. Take the first step today: research local professionals, get multiple quotes, and start planning your perfect, accessible shower to replace tub for a safer, more beautiful home.
Frequently Asked Questions (FAQ)
How long does the conversion process take?
It depends:
- Prefabricated Acrylic Systems (e.g., Bath Fitter): 1 to 2 days.
- Custom Tiled Remodels: 4 to 7 days, due to demolition, waterproofing, and tile curing.
Does this conversion increase my home’s value?
Yes. A modern, accessible walk-in shower is highly sought after by most buyers and is excellent for aging-in-place. It generally increases a home’s appeal and resale value.
Is converting a tub to a shower more expensive than a simple tub replacement?
Yes. A conversion requires more extensive demolition, plumbing modifications (raising the shower valve and adjusting the drain), and specialized full-area waterproofing, making it generally more costly than simply swapping out an old tub for a new one.
Can I convert my tub to a shower myself (DIY)?
No, it is highly discouraged. Proper waterproofing is critical. Failure to correctly waterproof the base and walls can lead to severe, costly damage and mold. Always hire a professional for the plumbing and waterproofing stages.
What’s the best design tip for a small bathroom tub to shower conversion?
Use a frameless glass enclosure. It allows light to pass through and extends the visual space, making the small bathroom feel significantly larger and less cluttered.
What is a ‘one-day conversion’?
It’s a method where prefabricated acrylic or composite panels and a base are installed directly over the existing wall/floor structures. It’s fast (1 day) but offers limited customization compared to a full tiled remodel.


